
Overview of Container Technology and Docker
A brief introduction to container technology and Docker.

Introduce the internal structure of Docker Image and explain the best practices for building Docker Image.
Before introducing the structure of Docker Image, let’s first understand the file system of Linux. The file system of Linux can be divided into two parts: Bootfs and Rootfs.
Bootfs is the boot file system, mainly containing the bootloader and the system kernel. Its primary function is to load the kernel into memory during system startup. Once the kernel is loaded, Bootfs will be unmounted, so it is a read-only file system.
Rootfs is the root file system and also the user file system. It contains the directory structure and files necessary for system operation, such as /etc, /bin, /usr, etc., and is the part that users can modify.
We always say that Docker containers share the operating system kernel. In fact, what they share is the Bootfs, and the isolation between their environments is achieved through the Rootfs.
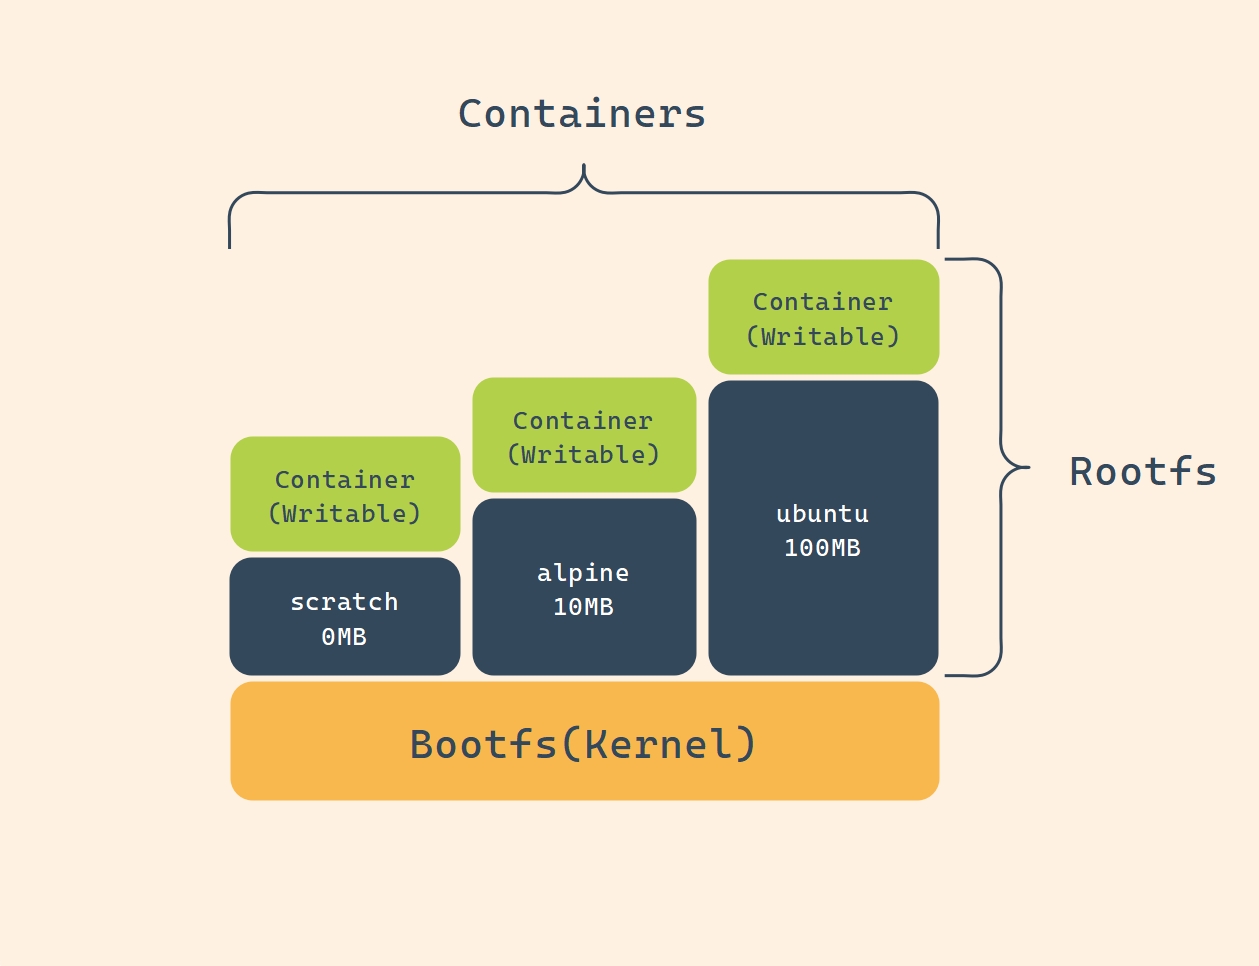
Bootfs and Rootfs
As mentioned above, building a Docker Image is the process of constructing a Rootfs. Docker uses Union File System to build Docker Images. Union File System is a layered file system that divides the file system into multiple layers, each of which can be managed independently but appears as a single file system externally. We can use the docker history command to view the layered structure of an image file.
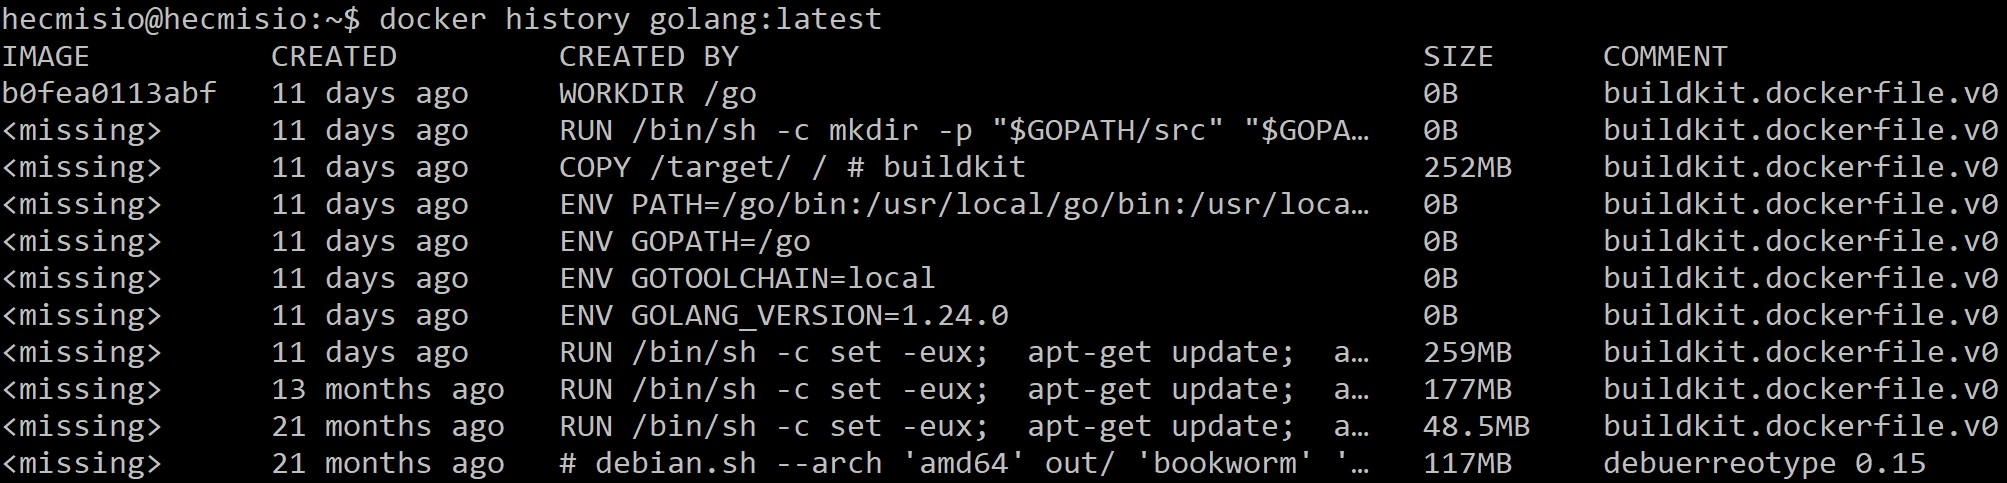
Image History
One important feature of Union File System is Copy-on-Write. When data in the read-only layer needs to be modified, a new copy is actually created in the writable layer for modification, thus keeping the original data unchanged. For Docker, the Docker Image is the read-only layer, and the writable layer is the Docker Container. Therefore, the Docker Container actually stores the modifications to the Docker Image.
Generally speaking, we hope that the image can provide a basic operating system environment, and users can install and configure other software or files as needed. An image that can meet such requirements can be called a base image. Common base images are usually the images of various Linux distributions, while scratch images (special images with nothing inside) are used less frequently.
Generally, there are two ways to build an image. One is to save a running container as an image using the docker commit command, and the other is to build an image through a Dockerfile and the docker build command.
The docker commit command generates a new image based on the modifications made to an existing container. It captures the current state of the container, including file system changes, but does not record the build process. Although this method is simple and convenient, it lacks reproducibility, makes it difficult to track specific changes, and is not easy to maintain. Therefore, it is more suitable for temporary or simple scenarios.

Docker Commit
The docker build command builds an image by executing the instructions defined in the Dockerfile, providing a highly controllable automated process that supports complex build logic and optimization. This is also the recommended approach in production environments and projects that require long-term maintenance.
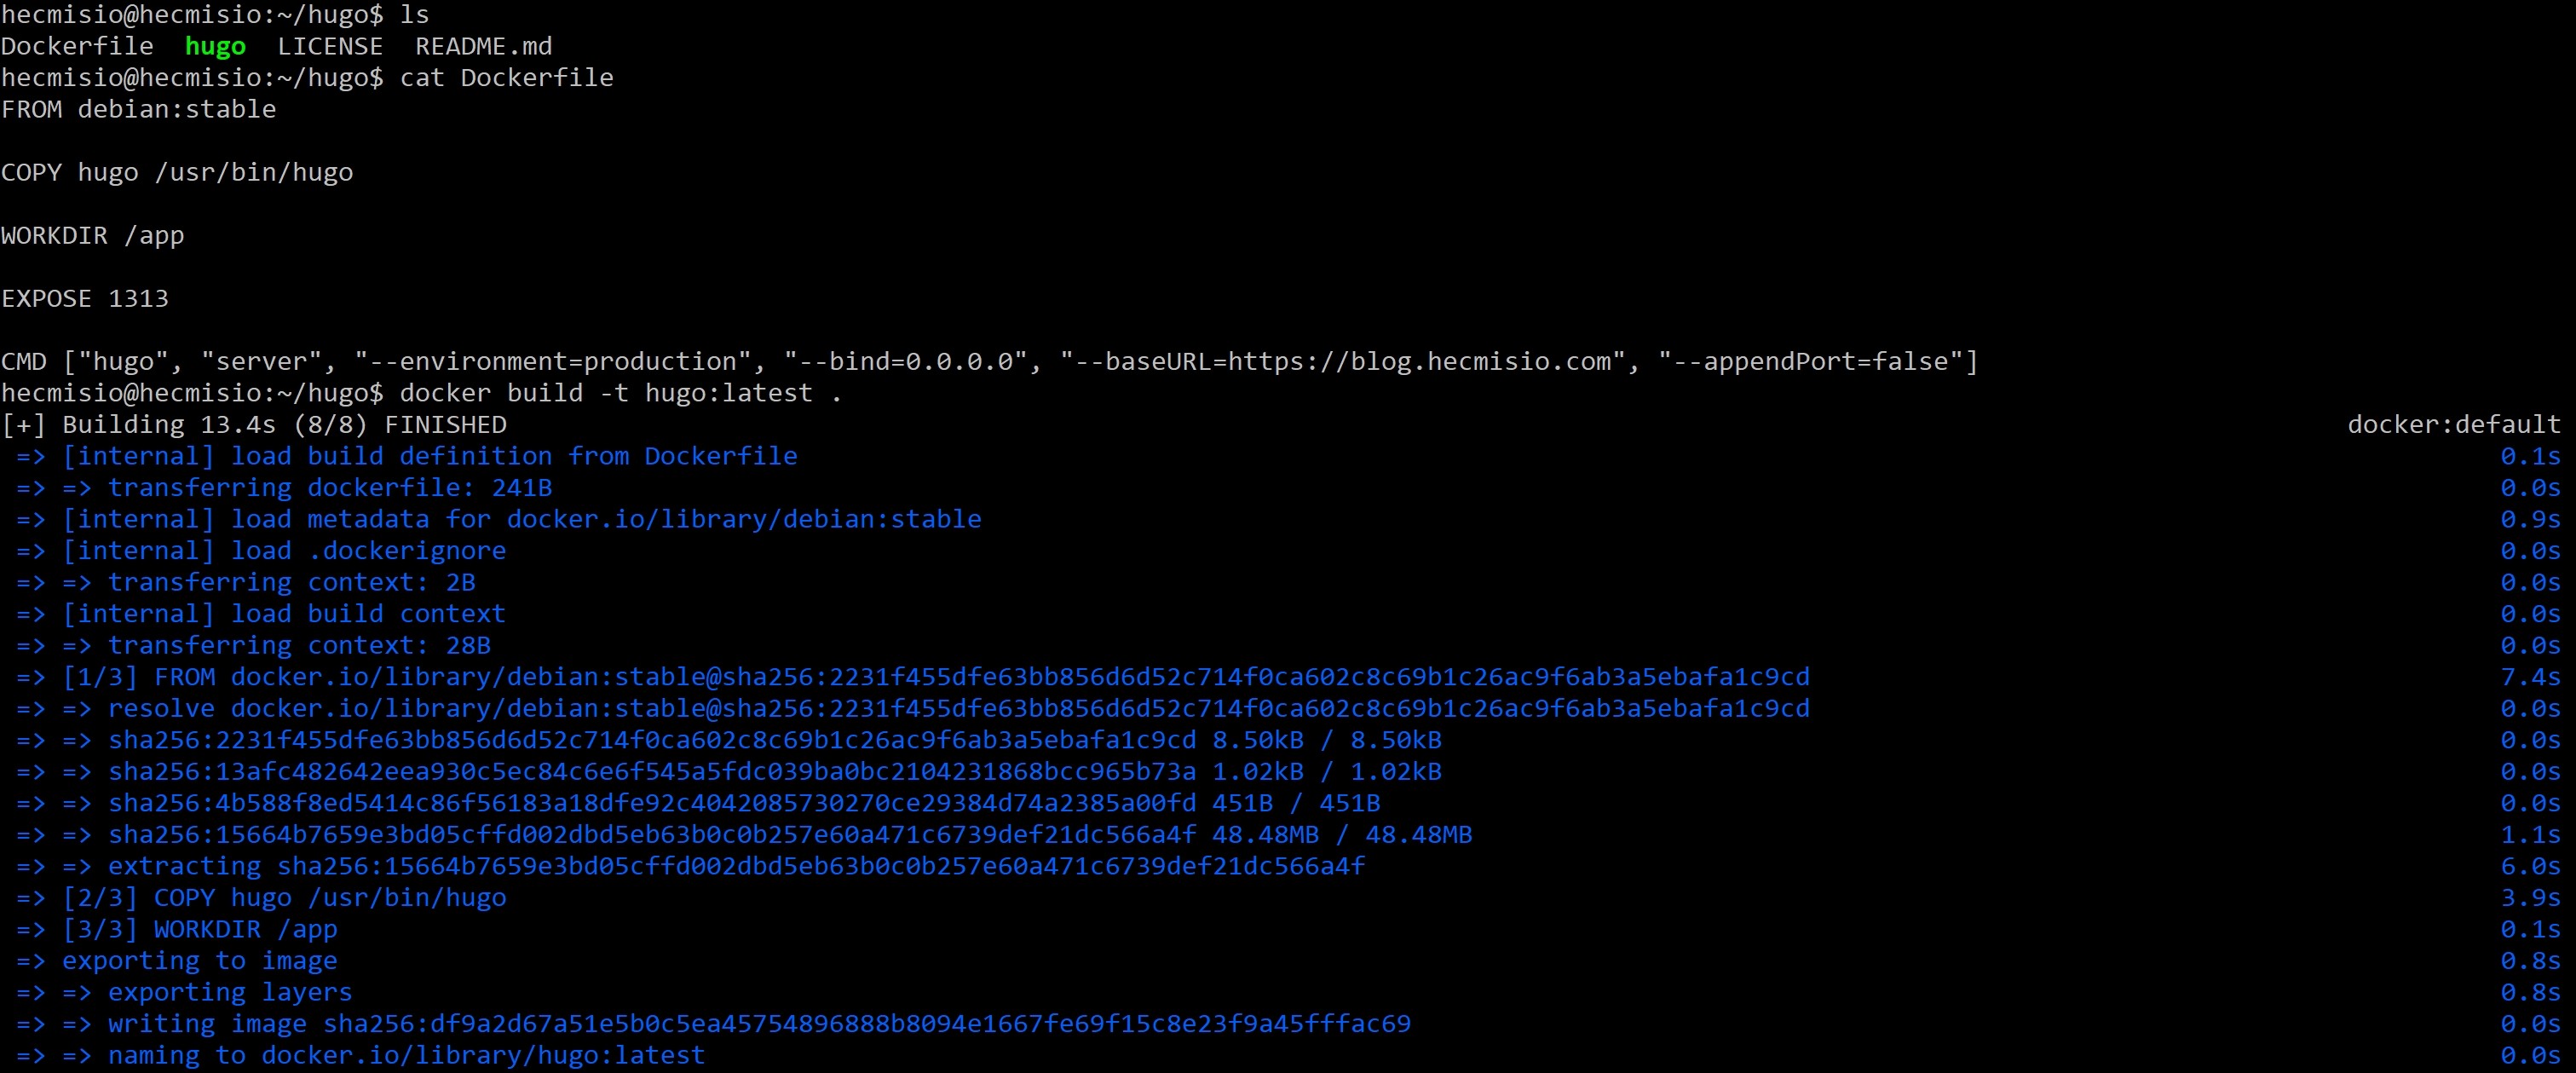
Docker Build
As can be seen from the examples in the “docker build” section, a Dockerfile is a text file composed of a series of [INSTRUCTION arguments] instructions. When the docker build command is executed, an image is built according to the description in this file.
The first instruction FROM in a Dockerfile specifies the base image. Each subsequent line of instructions adds a layer of files to this image, layering them up one by one to form the final image file. For Dockerfile instructions, you can refer to Dockerfile reference. There are two sets of instructions that are often confused, and they are specially noted here.
Both the ADD and COPY instructions are used to copy files or directories from the host to the image, but they have some key differences.
The ADD command can not only copy local files or directories but also download files from a remote URL and add them to the image. If the source file is a compressed package, ADD will automatically decompress it.
ADD http://example.com/file.tar.gz /app/

ADD local-file.tar.gz /app/
The COPY command can only be used for local files or directories and does not support downloading from URLs or automatic decompression.
COPY local-file.txt /app/

COPY local-dir/ /app/
The official recommendation is to prefer using COPY unless the specific functionality of ADD is required, in order to maintain the clarity and predictability of the Dockerfile.
RUN, CMD, and ENTRYPOINT are all instructions used to define the behavior of a container, but they differ in their functions and application scenarios.
These three instructions all support both the exec form and the shell form. The difference between these two forms lies in that the shell form will default to adding /bin/sh -c before the command, performing shell parsing on the command, and the default shell can be changed through the SHELL instruction. RUN commonly uses the shell form, while CMD and ENTRYPOINT are recommended to use the exec form, unless shell functionality is required.
The RUN command is used to execute commands during the image build process and save the results in the image, often for installing software. In fact, the RUN command creates a temporary container during the image build process and saves this container as an intermediate image through docker commit.
RUN apt-get update && apt-get install -y python3
CMD and ENTRYPOINT are used to define the commands to be executed when the container starts after the image is built. The difference lies in that CMD defines the default command for the container, which can be overridden by the command specified after the docker run command, and is typically used to define the default behavior of the container after it starts.
CMD ["python", "app.py"]

CMD echo "Hello, World!"
The ENTRYPOINT defines the main command of the container and cannot be overridden. It is typically used to package the container as an executable program. The ENTRYPOINT and CMD can be used in combination, with CMD serving as the default parameters for ENTRYPOINT, and can be replaced after the docker run command.
ENTRYPOINT ["python", "app.py"]

ENTRYPOINT echo "Hello, World!"
ENTRYPOINT ["python"]

CMD ["app.py"]

docker run my-image # python app.py
docker run my-image script.py # python script.py
In Docker, image caching is an optimization mechanism used to accelerate the image building process. Docker caches the build results of each layer. If the context and instructions remain unchanged in subsequent builds, Docker will directly use the cached results instead of re-executing the instructions. This is also reflected when pulling images. However, if the context of a certain instruction changes, the cache will become invalid from that instruction onwards, and all subsequent instructions will be re-executed. Therefore, making good use of image caching is an important optimization mechanism for accelerating image building. By arranging instructions in a reasonable order, minimizing the context, and merging instructions, the cache can be utilized to the maximum extent. Of course, the --no-cache parameter can be used after docker build to forcibly disable caching.
Optimizing the image building process can enhance the building speed, reduce the image size, and improve the development efficiency. The following are some common optimization methods.
Use the .dockerignore file to reduce the size of the build context.
Arrange the instructions in the Dockerfile reasonably, placing those with lower change frequencies at the beginning to make full use of the cache.
Merge the RUN and CMD instructions, reduce the number of image layers, and be sure to clean up unnecessary files in a timely manner to shrink the image size.
RUN apt-get update
RUN apt-get install -y curl
RUN rm -rf /var/lib/apt/lists/*

RUN apt-get update && \
    apt-get install -y curl && \
    rm -rf /var/lib/apt/lists/*
# unoptimized
COPY file1.txt /app/
COPY file2.txt /app/

# optimized
COPY file1.txt file2.txt /app/
----------------------------------
COPY *.txt /app/
----------------------------------
COPY my-dir/ /app/
# unoptimized
COPY script.sh /app/
RUN chmod +x /app/script.sh

# optimized
COPY script.sh /app/ && \
    chmod +x /app/script.sh
Choose a more lightweight base image.
Use multi-stage builds to shrink the size of the final image.
Optimize the build using ARG and ENV. Use ARG to pass build-time variables and ENV to set runtime environment variables.
ARG APP_VERSION=1.0
ENV APP_VERSION=${APP_VERSION}
The tag of an image is an important part of its name. Making good use of tags can help us manage image versions better.
First of all, it is necessary to note that the “latest” tag has no special meaning. It is only used by default when no specific tag for the image is specified. Therefore, when we use an image, it is best to explicitly specify a certain tag.
In addition, the Docker community generally adopts a scheme where multiple tags correspond to the same image. For instance, when releasing the myimage image, it is tagged with 1.1.0, 1.1, 1, and latest. When 1.1.1 is released, it is also tagged with 1.1.1, 1.1, 1, and latest. This ensures that latest always represents the latest version, while 1.1 and 1 always represent the latest versions of their respective branches. If you want to use a specific version of the image, you can specify it through x.x.x.
Containers share the Bootfs while isolating the Rootfs from each other to ensure the isolation of the application runtime environment. Docker Images use UnionFS to implement a layered architecture and leverage the Copy-on-Write mechanism to keep the image layers read-only, while saving modifications to the image in the container layer.
Both docker commit and docker build can be used to build images, but docker commit is only suitable for temporary and simple scenarios. In production, it is still recommended to use docker build and Dockerfile to build images.
In Dockerfile instructions, although both the ADD and COPY instructions can copy files or directories from the local machine to the container, the ADD instruction can also copy remote files and automatically decompress compressed files. Generally, the COPY instruction is sufficient. The RUN, CMD, and ENTRYPOINT instructions are all used to execute commands, but RUN is used during the build process, often for installing software and configuring the environment, while CMD and ENTRYPOINT are used to define the actions when the container starts. CMD is used to set the default command and can be overridden, whereas ENTRYPOINT is used to set the main command and cannot be overridden. The two can be used in combination, with CMD serving as the default parameters for ENTRYPOINT.
Optimizing the image building process can accelerate the building speed and reduce the image size. This can be achieved by considering two aspects: reducing the size of the build context files and optimizing the Dockerfile instructions.
Reasonably setting tags for images is beneficial for image version management. Usually, a multi-tag approach is adopted, where the same image is pointed to by tags such as x.x.x, x.x, x and latest when it is released.
A brief introduction to container technology and Docker.